|
Video-Walkthrough see below
 Print version of this page
 (coming soon) (coming soon)
What's this all about?
This is the second huge area labeled 'Geothermal Valley', because here and there
the ground steames du to geothermal activities. There are several bonus tombs
and challenges, this means best action-vacation!
Warming up – Enter the valley
and Fighting preparations
– Explore the valley
I just don't know why they've called it 'warming up'
because it doesn't look cold at all...
 Anyway, right there you'll find some
ammunition, go left and upstairs, then proceed until you can use a zipline which
brings you directly to a nice video clip. Immediately after the video you'll see
a survival cache
(1/20) blinking to the right and of course you've noticed the crate, right? Now
on to the Valley Farmstead base camp,
there's also a relic nearby. Anyway, right there you'll find some
ammunition, go left and upstairs, then proceed until you can use a zipline which
brings you directly to a nice video clip. Immediately after the video you'll see
a survival cache
(1/20) blinking to the right and of course you've noticed the crate, right? Now
on to the Valley Farmstead base camp,
there's also a relic nearby.
Savegame 10 = Start of the next part (10th slot
in my 100% Savegame, which contains 29 slots)
Note: At this point
I've used fast travel back to the Radio Tower base camp, because there is the
supply shack
(where you can buy things with your found coins). On your map this place has a
shopping bag icon, you're welcome here as long as you have bucks to spend. If
you run out of coins, a lock icon represents your current status – you're broke.
Here you can also start the
challenge Capture the Flag
by cutting the nearby flag with your knife (1/7). Enter the shack and check the
available items, (89/25) for example means that you have 89 coins and the cost
of the item is 25 Sloti or Tingi, which is the official currency in Kazakhstan
(this told me my Kazakh workmate). Check your map as well, maybe there are new
items highlighted which you can loot or dig up. For example I was now able to
read the monolith at the sawmill, which unlocks some new coin caches. Other
flags (for the challenge) are at the Copper Mill yard, around the area of the
sawmill, at the Sheltered Ridge base camp (go left towards the supply shack).
Now you can also open the two remaining caves in the first Siberian area, one
with a rope arrow, the other one with your gun.
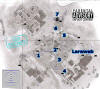
Capture the Flag -
Click to enlarge!
Bonus tomb – Voice of God
(Soviet Installation)
You'll find the corresponding video on page/level 5 –
Soviet Installation, Video
no. 14, beginning at 2:00. On the Soviet
Installation map you'll have to enter the cave in the upper right corner (a
tiger or puma icon is nearby). Beware, there is really such a beast, so be
prepared. In the cave you'll also find a coin cache. Open the blocked entrance
with a
rope arrow and
proceed until you reach the Frozen Gorge base
camp. No go left until you see the actual tomb.
Where to go should be straight forward but at the end you should not go over the
small bridge, instead make your way over the stone wall to the left, at the very
end of the path you'll find a survival cache. Now shoot a rope arrow into the
roped pole and use the zipline to reach the relic there. Jump up to the opening
and with another rope arrow you can slide back. Right now your back at the
beginning of this climbing tour, proceed again towards the big door. The small
bridge collapses, you'll have to jump and to use your axes (X). Climb up to the
door. You'll find a relic and a backpack which unlocks more goodies on our map.
Finally enter the chamber and loot everything that glows. Then turn the crank
until the door is closed. You can now use this door to climb and jump to the
left into the next area, there's a document. Jump to the glowing wall and smash
it. Go through (into the main chamber) and open the door again. Now back to the
next room and turn the crank, then shoot a rope arrow into the roped bell. Turn
the crank handle to raise this bell now, on the other side of the crank there's
the 'release button', use it (X) in the very moment when the wind (coming from a
hole in the wall) starts to blow. If timed right, the bell will crash the ice
and free the counter weight. Now go back into the main chamber and open the next
door with the crank, then proceed down to the codex and collect your
reward – Inner Strength.
This skill heals Lara automatically once during a fight. A worthy price! To get
back just shoot a rope arrow into the pole and climb over. Jump to right and up
in the opening, now shoot a second rope arrow and use the zipline. Jump again
right and up and you'll end up at the path which leads to the Frozen Gorge base
camp...
Bonus tomb – Ancient Cistern (Soviet Installation)
You'll find the corresponding video on
page/level 5 – Soviet Installation, Video no. 8, beginning at 9:30
Near the sawmill you can shoot at the suspending, holding the big tube hanging
on the digger. Do this and the entrance to the bonus tomb opens (a shaft will be
visible there). You'll find a wall painting and proceed to the end of the
corridor. There's also a relic. Jump to the climbing wall and make your way down
until you'll reach another relic. Jump to the bar and let go in the right
moment. Proceed, then shoot an arrow on the container to the right of the round
plate. You'll reach eventually the Cistern Cavern
base camp. Proceed and jump up to the path,
then go right and jump from the red plank to the bar. It'll break and Lara ends
up in the water. Swim behind the grid and through the arched gate, then go
ashore. Take a can and throw it to the blue plate. Shoot at the can and water
flows in. Go back into the main chamber. Use the stairs to go ashore and throw
the next can on the raft. Now go up (you'll find a document). Jump to the bar,
then let go and shoot at the can on the raft in the very moment, when the raft
is near the blue plate in the wall (the raft stops briefly). Again water flows
in and you can swim through this new tunnel. Proceed the stairs up, there's
another document in a niche. In a small corridor you'll find a wall, smash it.
Now listen carefully, in the end it's very simple. Go back to the main chamber
and throw another can on the raft, jump again on the bar, let go and swim to the
raft as fast as possible (B). Climb up and throw the can through the hole in the
wall (the smashed wall) into the next cavern. Enter the cavern, take the can and
use it to open the last blue plate. The water level will raise again and finally
you'll be able to reach the codex. Your reward is the
skill Natural instincts
(nearby resources automatically appear on your map and glow when you are near).
This will come in very handy in the future! Now you can swim to another niche
and collect some coins as well as a treasure map, then go back to your camp...
Search all shacks and grab everything else around here, to
the left there's a small cave which you can unlock. At the gourd field you'll
find a monolith which unlocks some coin caches on your map. Near the monolith
you'll find sort of a tent, there's a document. Here you can also start the
challenge Hung Out to Dry
– cut down the dried corpses of rabbits. After that you can even skin them.
Nearby you can climb a tree and from there to the tower – there's a document. On
one side of the tower you'll find a wall painting. Now proceed to the guy
glowing green with RS, he offers missions. Right now the
mission Defensive Strategy
is available. You'll have to collect hardwood and deer hides, maybe you'll
aready have them. In case not you'll see a green circle on your map, that's the
area where you'll find all the stuff. Go along the creek into the little wood
but beware, there's also a tiger roaming around. You'll also find 2 coin caches
there. If you've collected everything go back to the principal. Then you have to
place some of the items in a basket nearby, the rest should be placed in another
basket near another watch tower. Just look at your map and follow the green
circle. It's down in the woods which you can also search for goodies. When you
have placed everything in the baskets, go back to the guy and the mission is
finished. By the way, in the small forest there's also a cave with a bear, this
brings rare items but of course it's not that easy to kill the beast...
Back to the challenge Hung Out to Dry.
You have already the first one, the next one ist near the guy who's given you
the mission and the rest is down in the grove.
Challenge: Fowl Play. Collect 5 chickens (X),
then throw them in the small pen near the gourd field. Funny!
If you leave the camp and go right and
down the stairs, you can shoot at some planks and grab a map.
Challenge: Bull's Eye.
Near the first camp there are 4 bull's eyes hanging, shoot in their center with
your bow. The first one is to the left on the big archway, the next ones are
near the shacks, for no. 5 you have to jump over the small broken bridge (upper
left corner on your map) and proceed to the dead grove. Beware, in the cave
nearby resides a bear... there's also the entrance to a bonus tomb but right now
you're still missing the rebreather. Bull's Eye no. 6 is nearby under the wooden
bridge (near the waterfall). Proceed over these wooden bridges until you'll
reach a paled gate and a backpack (unlocks some hidden caches on your map), on
this side of the bank you'll see bull's eye no. 7. Do not use the tunnels, there
are hamsters... Go back towards the shacks and proceed on the left side of the
creek (upper left corner on your map), cross a bridge and move on until you
reach a prickly barrier. To the right there is the last bull's eye.
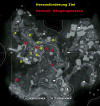
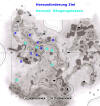
Hung Out to Dry (=Hängengelassen)
and Bull's Eye (=Ziel)
Click to enlarge!
Speaking of the grove: go back there and search the whole
place for goodies. There are still some coin and survival caches, later on
you'll get a map for these or a backback (see above). Now go to the woman near a
shack (glows green with RS), she has a mission
called Surveillance Disruption. You have to
shoot down 4 drones – nothing special there, just follow the noises... When it's
done go back to the woman, she offers another
mission: A Hearty Meal. You have to collect
mushrooms and meat of 2 boars. The animals are nearby, just cross the creek and
hunt'em down. Bring everything back to the woman and now on with the main story!
Down the river you'll find a bridge leading to a camp of your new comrades...
Fighting preparations – Light the signal fire on the
tower. Right of the camp of your comrades
you'll find your own camp called Ruins Encampment
base camp. Now you'll have to go to the big
tower in the lake. Use a rope arrow to create a zipline and climb over. On top
you'll find the oil flask, now you can create
fire arrows. Fire arrows can burn fabric,
explosives and enemies without armor. Push 'up' repeatedly on your directional
pad until fire arrows are selected. To create those arrows you'll neet fabric,
oil and standard arrows. Now hold RB to create them. Proceed to the small plank,
jump to the next one until you reach the hanging platform. Take your bow, select
fire arrows, hold RB and aim for the top of the spire, then shoot. Now the
signal fire should burn and you end up near some oil can which you can use to
stock up your oil (X).
Meet Jacob in the upper village.
Shoot a rope arrow into the roped bar and slide down. You'll end up near a
crate. Proceed to the next ruin, there's a wall painting and a woman with a
mission: Ancient Secrets.
It's about mastering all bonus tombs, which brings points and/or coins.
Everytime you've mastered one of those tombs, go
back to that woman and collect your reward.
 Nearby you'll find a monolith
(you can't read it for now), proceed to a guy nearby until you hear the sound of
a chopper. Move on until you reach some kind of swamp and to the left you'll see
a fire – you can go ashore there. Time for a good old fight! First you'll see a
nice video and you'll receive a new toy, the
pumpgun. And here we go... use the new weapon
to spread some lead and don't forget to loot the bodies. Nearby you'll find a monolith
(you can't read it for now), proceed to a guy nearby until you hear the sound of
a chopper. Move on until you reach some kind of swamp and to the left you'll see
a fire – you can go ashore there. Time for a good old fight! First you'll see a
nice video and you'll receive a new toy, the
pumpgun. And here we go... use the new weapon
to spread some lead and don't forget to loot the bodies.
Just keep on fighting until the next savepoint, then the funny flame thrower
appears. Try to shoot him in the back and his red tanks there and don't get near
him, he'll knock you down. If necessary you can heal yourself with LB.
Savegame 11 = Start of the next part (11th slot
in my 100% Savegame, which contains 29 slots) After flame thrower.
After the
fight... →
Follow the path upwards to the tower.
You'll find a map, a document and a crate, talk to everybody and you'll receive
some ammunition. Now jump down into the water and swim to the right, you can go
ashore there. You'll find the Aqueduct ruins
base camp, as well as a backback and a
monolith. Use the climbing wall near the 'exit' and proceed...
This is the end of the main story
in the Geothermal Valley, the following things are optional, some you even can't
do now because of some missing items/skills (Wire Spool, broadhead arrows
(climbing arrows) and rebreather). Note:
with the broadhead arrows you can climb the tree near the upper bear cave and
grab a goodie (the tree glows with RS).
Map see below!
Tip: In the Geothermal
Valley you can hunt bears, boars, leopards and deers and you can use the
collected ingredients at any campfire to create new and very useful equipment.
If you're lacking of ammunition, just go back to the train yard, kill some
baddies and grab their ammunition.
Bonus
tomb – Baths of Kitezh
Geothermal Valley, video no. 30, page 9: Flooded
Archives, beginning at 10:00.
It's in the upper part of your map, in the little dead grove. There is a cave,
normally inhabited by a bear (you can even see a bear icon on your map). In this
cave is the entrance to the bonus tomb, but you'll need the
rebreather in order to
dive. If you've finally made your way in, time it right and balance past the
water fountains. You'll reach the Whirlpool Sanctuary
base camp. Beware,
there is a spike trap on the floor, collect 2 relics. Move the stairs up, to the
right you'll find a document, to the left there is the way to the main chamber.
Jump in the water, in a niche you'll find a treasure map. Swim through the small
entrance nearby and grab a document there. Also you can open a door leading back
to the camp with a rope arrow. Now back to the main chamber and to the boat.
Jump aboard and stand near the crank, then shoot a rope arrow to the roped pole.
Now you're able to crank the boat in the middle of the chamber. Shoot another
rope arrow to the right (east on your map) in the appropriate bar and crank the
boat in this new direction. Finally you're able to jump into the 'window', when
you pull the lever at the other side of the room the water drains. As it tries
to flow back again shoot a rope arrow into the crank, run over there and turn it
as fast as possible. When done right, the water is gone. Swim to the right
through the 2 openings into the next room, the setup here is quite similar, but
a crank is missing. So you have to crank your boat next to the entrance in order
to use the crank on the boat. Pull the lever, watch the water drain, then shoot
a rope arrow into the crank on your boat, swim over and turn the crank. Done...
When all the water is gone you'll see coins (2 places) with RS as well as
explosive barrels – shoot at them. Behind you'll find more coins as well as the
codex and your reward: 'Iron grip'.
Climbing on stony or icy surfaces is much faster now. Go back to your camp but
mind the floor traps!
Ridiculous ways
(Geothermal Valley):
In the upper part of your map near the dead grove with the bear cave there is
that tower with the wall painting. You can jump on this tower using a nearby
tree, now you'll see a roped block. You can pull it with a rope arrow and jump
quickly on it. Wait briefly and the trunk moves slowly forward again. With the
Wire Spool you can jump on the roof of the tent and using the tool again you can
make your way over the rock walls near the creek (they glow with RS) and proceed
to the backpack (unlocking secrets on your map) and further on to the entrance
behind the waterfall. Enter the dark caves, find a wall painting, there's also a
rope leading to a sarcophagus – this is another
crypt treasure.
(Geothermal Valley):
There's another crypt entrance
marked on your map (lower right corner). There you'll find a wall painting, a
document and of course a sarcophagus with another
crypt treasure – in my case a new bow was
unlocked (as well as some new secrets on your map).
Bonus
tomb – Pit of Judgement (Geothermal Valley)
Video no. 31, page 9: Flooded Archives,
beginning at 6:00.
This is the tomb marked in the middle of your map, you'll need the
Wire Spool to get to
the Hidden Ravine base camp.
Grapple over the next chasm and you'll find a backpack to the right. Proceed, a
slomo sequence starts and you'll have to jump and grapple quickly. Proceed over
the log, there should be a survival cache. Crouch and Lara falls down. Swim to
the big wooden structure, to the left you'll see the blinking of another
survival cache. Take the right ramp and move up, at the end you'll find a relic.
Now use the crank and turn the cart around (180°), then shove it until it runs
down. Shoot a rope arrow near the crank down to the other ramp and slide down.
There is a relic. Jump on the wooden structure and you'll find another survival
cache (also marked on your map). Use the crank to bring down the platform,
proceed to the other crank and turn it until you're able to shove the cart on
the platform. If you bring up this platform now you'll notice that the cart
would turn. You have to adjust the cart (turn it again) until it finally has the
right position, now shove it down. Jump into the water, proceed through the
entrance and you'll find another document as well as some goodies and of course
the codex with your reward: Geologist
- Geological knowledge allows mining of Chromite Ore. Some weapon upgrades are
only possible with this skill and the Chromite ore! The way out is similar to
the way in.
Bonus
tomb – House of the Afflicted
(Geothermal Valley):
Video no. 21, beginning at 12:00.
It's rather at the beginning of this area. Go to the creek and the partially
destroyed bridge, use a rope arrow to swing over, then crouch trough a gap.
Beware, you'll be greeted by a pack of wolves! Enter and look around with RS.
You'll find a relic nearby a well, there's also a survival cache. On to the
Infirmary base camp
(document), then proceed to the courtyard, to the right you'll see the blinking
of another survival cache. In the back you'll find a relic. In the courtyard
you'll see a cart with a barrel to the left, pull it as far as possible. Now
look around (with RS everything becomes much clearer!). There's a platform and a
barrel with a lever above. Shoot a rope arrow in this lever just to see how it
works. The goal is to hold the barrel down. Pull the lever again and when the
barrel is down, shoot a rope arrow quickly to the cart which you have pulled
out. Now proceed to the wooden plate in the rear left corner. From there shoot
another rope arrow directly above in the roped block, now the platform hovers
above the ground. Now cut the rope of the cart and now you'll have to do it all
again. Pull the lever with a rope arrow, shoot another rope arrow from the
barrel to the cart and by now the rear platform should have raised up in the
air. Proceed over the stairs, the poles and the 2 platforms upwards to the
entrance, on the railing you'll find a document. Inside you'll find a treasure
map and a codex unlocking the skill 'Fast
Healer' (you can heal yourself faster now using
LB)
Bonus
tomb – Catacomb of Sacred Waters (Geothermal Valley)
Video no. 23, beginning at 14:30
The entrance is near the Ruins Encampment base camp. Proceed to the main hall,
in the back you'll find a relic. From there make your way to the Aquifer Cavern
base camp.
Nearby you'll find a document. The waters are deadly here so you have to find
another way to get over. Stand to the left of the rotating wheel and shoot a
rope arrow into the boat. Now you can jump on it. Right now shoot another rope
arrow to the crank on the island, now you can jump over. There's a document and
coins in two places. And now the challenge begins... Pull the boat behind the
waterfall near (with a rope arrow) and jump on it quickly. If you fail you can
climb the boat from the water. Stand near the crank of the boat and shoot a rope
arrow in the crank on the other bank. If done correctly, crank your boat (X) to
the temple. I needed 5 tries to get there. Now you can collect everything,
treasure map, relic and the codex, which unlocks the
skill 'Anatomical Knowledge'.
You can now 'see' the hearts of animals when you're on the hunt (with RS).
Shooting at the hearts kills animals instantly. Now you can jump upwards, smash
the wall and use the rope to the left in order to reach your camp
Challenge: Tossing Gourds (Geothermal Valley)
You can do this later on when there are no more enemies around. Go to the
Cathedral Courtyard base camp and move up the stairs. Now you have to go down to
the big camp fire. Hang on the edge, climb down to the next edge and now let go
and quickly use your axe to hook up and use the rope to go further down. Go to
the big camp fire and to the next one, to the right you'll see some gourds in
the grass. Take one (with X). If you use your survival instincts (RS) you'll see
a barrel glow behind the fallen tree. You have to toss the gourd into this
barrel. It's not that easy, you have to aim precisely. This was gourd 1/5 and
there are also 5 barrels near the gourd field. Three of them are behind the
fence, the fourth one is on the brown wooden thingy and the last one is to the
left behind the house. If you miss and you are not able to grab the gourd again
(when they are behind the barrier and you can't reach them) try to shoot them,
then they will respawn in the meadow. It's a bit like playing basket ball, I
needed 30 minutes to complete this challenge (and rolling a cigarette).
Challenge: High Diving (Geothermal Valley)
You have to dive into the water in four places in a special way. Let's begin at
the Ruins Encampment base camp. Go to the big tower standing in the lake (where
you have lighted the signal fire). With RS you'll see a small red springboard
and you'll have to jump into the water from there. Here goes: jump while holding
forward and pull LT quickly in the air. If done right, Lara makes a swan dive
(if not, she'll jump with her feet forward). You'll be noticed if done
correctly. Go ashore and to the big camp of your friends, move under the rock
upstream and you'll see the next springboard glow (with RS). From there go back
to the big wood in the valley, at the wooden tower you'll see the next
springboard. Important:
Maybe you should try here and work on Laras diving techniques. She should not
cross her arms before her body but instead stretch them out. The last jump is
near the Ridgeline base camp.
Right now one mission from
the Geothermal Valley is not complete, it's the
one where you have to master all 9 challenge tombs...
Here is the
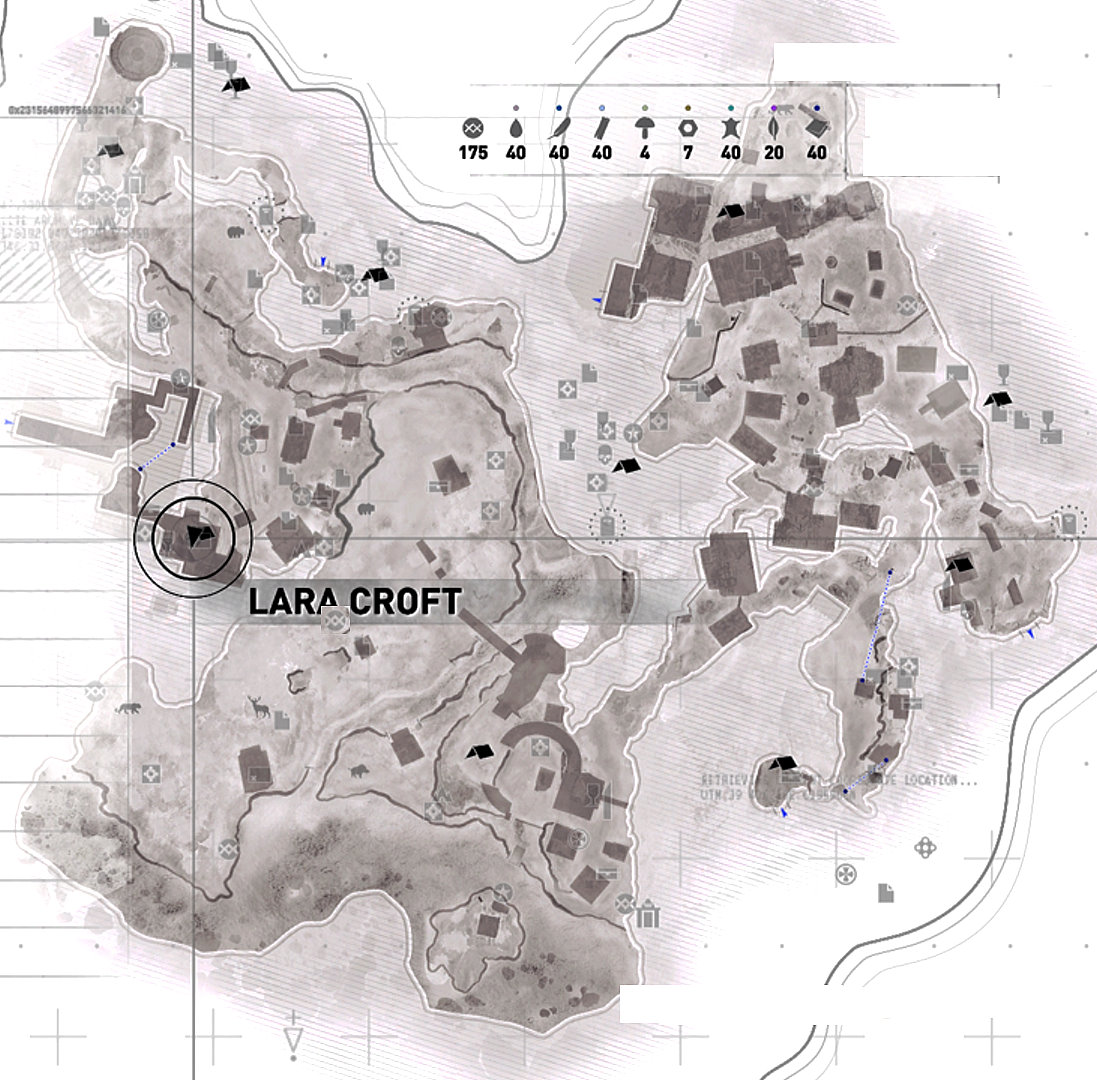
map
of this area, unfortunately you have to look very close in order to recognise
everything but you can print it out (you can also paint it, if you like
)
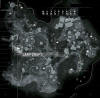
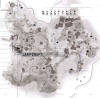

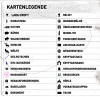
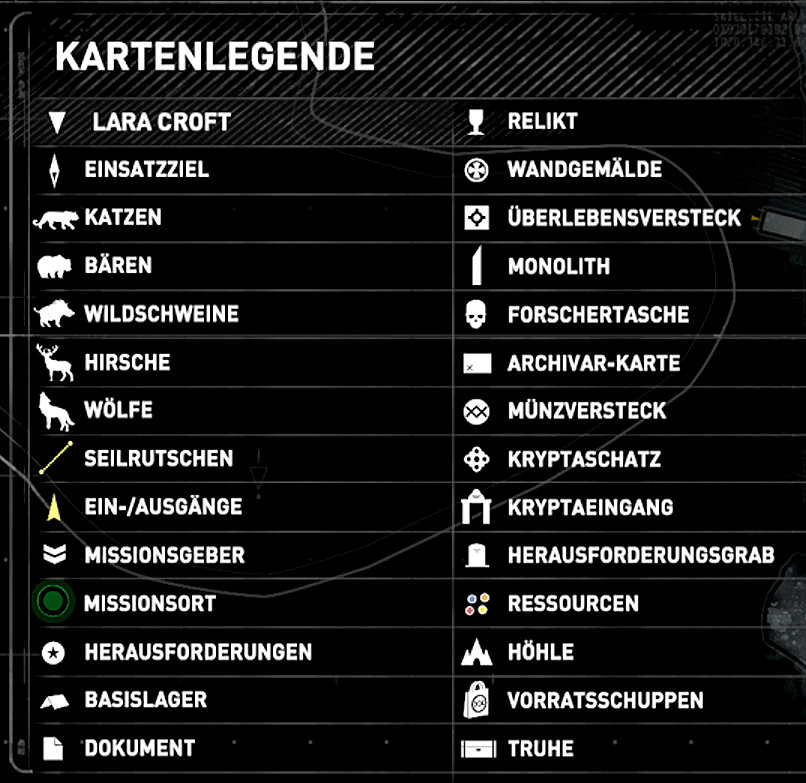
Map normal - Map print version - Legend -
Click to enlarge!
Video: Look
at the german version.
Letzte Aktualisierung:
25.06.2021 Last update:
Juni 25, 2021
Hit F5
to refresh, to see the latest version of this page! |